
This is a guide on self-hosting publicly accessible stuff on your own hardware, from your own home; because not your hardware, not your data. This is an extended version of the workshop I gave at Clube Bitcoin UnB.
Contents
- Why run stuff on your own hardware?
- Network Topology
- Bill of Materials
- VPS Hardening
- VPS Setup
- Server Setup
- pfSense Setup
- Reverse proxy
- Conclusion
- References
Why run stuff on your own hardware?
As stated above, not your hardware, not your data. People in general have become too used to uploading whatever to some cloud, not knowing that this cloud is just someone else's computer (and who knows what this "else" does with the data you give away).
If you plan to use Bitcoin in a private and sovereign manner, this is even more important. You should run your own node, which is your interface to the Bitcoin network, to verify and broadcast transactions. If you want to use the Lightning Network in a trustless manner, or run a routing node, you should run your node on your hardware; if you run it on a VPS, anyone with root access can snatch away your funds. Leaving the realest money there is on a hot-wallet connected to the internet is not very safe, especially if you don't own the hardware it's on.
Network Topology
This is what the network will look like:
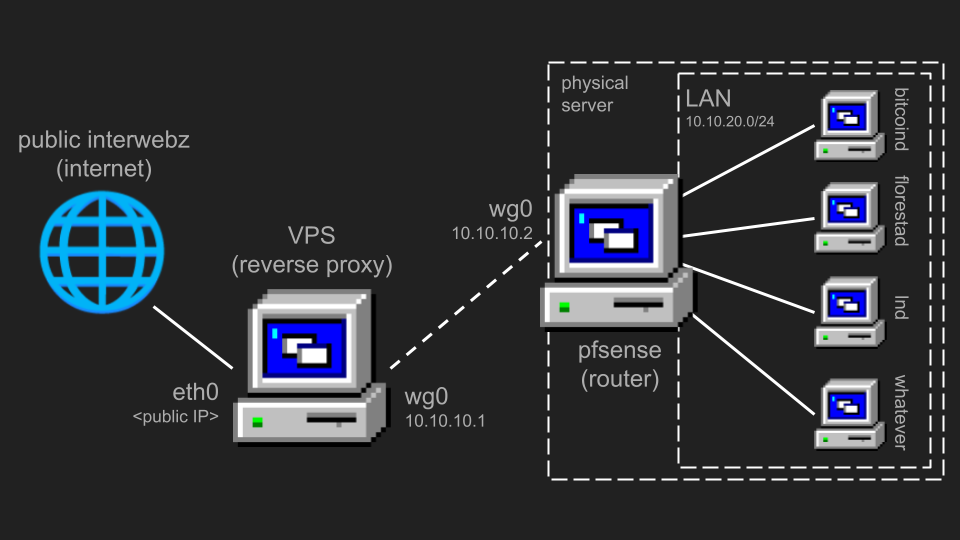
We'll use a VPS as a reverse proxy (a public gateway). It will close a VPN tunnel to the pfSense router, securely routing our traffic over the wire.
To keep the setup compact, everything is virtualized via Proxmox (yes, even pfSense). You just plug a single box and it magically works.
Ideally, the physical server should have two network interfaces. You can buy an USB-RJ45 adapter for this. One interface will be pfSense's WAN, and the other pfSense's LAN. This is useful for when you invariably fuck up the network config and need to access the admin UI. Also, leaving both Proxmox's and pfSense's admin UIs WAN-accessible is a very bad security practice.
Bill of Materials
- 1x Server with 2 NICs
- 1x Cheap VPS (1 CPU / 1GB RAM is enough)
VPS Hardening
Disable SSH password authentication (password auth is a shitcoin), and ideally use hardware-based auth:
~$ vim /etc/ssh/sshd_config

PasswordAuthentication no
Install ufw:
~$ apt install ufw
Later, open the ports necessary to run what you want (eg: 8333 for bitcoin, 9735 for lightning, 50002 for SSL electrum).
VPS Setup
The VPS will serve as a the VPN server, and pfSense will serve as the VPN client, since the client can be behind CG-NAT and it's IP can change. The client will always initiate the connection.
Install wireguard:
~$ apt install wireguard
Generate two key pairs, one for server and one for client:
~$ wg genkey | tee server-priv | wg pubkey > server-pub

~$ wg genkey | tee client-priv | wg pubkey > client-pub
Now, create wg0.conf:
~$ vim /etc/wireguard/wg0.conf

# VPS
[Interface]
# servers wg0 address
Address = 10.10.10.1/24
ListenPort = 51820
PrivateKey = <server-priv>

# enables multiple clients to talk to each other and reach the LAN
PostUp = iptables -A FORWARD -i wg0 -j ACCEPT; iptables -t nat -A POSTROUTING -o eth0 -j MASQUERADE
PostDown = iptables -D FORWARD -i wg0 -j ACCEPT; iptables -t nat -D POSTROUTING -o eth0 -j MASQUERADE

# pfSense
[Peer]
PublicKey = <client-pub>
# allow packets from pfSense and from LAN
AllowedIPs = 10.10.20.2/32, 10.10.10.0/24

# create more keys, add more peers
Now, enable the new interface:
~$ wg-quick up wg0
Server Setup
First, we need to define what our Wireguard and LAN networks will be. Here, we'll use 10.10.10.0/24
for Wireguard and 10.10.20.0/24 for LAN.
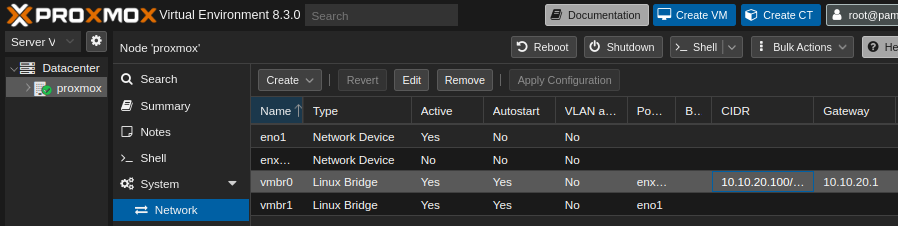
Install Promxmox, then go to Datacenter > Proxmox > System > Network.
On vmbr0, put 10.10.20.100/24 as CIDR, and 10.10.20.1 as Gateway.
Also create a new network bridge vmbr1 and connect a physical port to it
(this will be the WAN bridge, and vmbr0 will be the LAN bridge).
Important: when creating new VMs and LXCs, set the MTU to 1300. This is because with the default value of 1500 + the Wireguard overhead, packets can be dropped (I'm looking at you github.com).
pfSense Setup
Now, install pfSense as a VM. I'll outsource the setup of pfSense to this Mullvad blog post.
After you're done, all traffic should be routed through the tunnel and out the VPS. Test this via:
~$ curl ipinfo.io
You should be seeing your VPS's IP address.
Reverse proxy
To proxy requests, we'll use nginx.
~$ apt install nginx
To proxy HTTP traffic to 10.10.20.11:
~$ vim /etc/nginx/conf.d/default.conf

+ server {
+   listen 80;
+   proxy_pass http://10.10.20.11:80;
+ }
If you want to proxy raw TCP streams:
~$ vim /etc/nginx/nginx.conf

+ stream {
+   include /etc/nginx/conf.d/*.streamconf
+ }
Let's say you want to proxy Bitcoin P2P and LND P2P traffic,
both to 10.10.20.17:
~$ ufw allow 8333
~$ ufw allow 9735

~$ /etc/nginx/conf.d/default.streamconf

+ server {
+   listen 8333;
+   proxy_pass 10.10.20.17:8333;
+ }
+
+ server {
+   listen 9735;
+   proxy_pass 10.10.20.17:9735;
+ }
You should now be able to hit your public IP and be served content from your local network.
If the resource you want to access is meant to be private, like a password manager of file server, you should add a new Wireguard client and access it directly, without doing any reverse proxying. Never make things like these public.
If you're feeling fancy, segregate public and private services on different
LANs. This would imply creating vmbr2 and adjusting pfSense and the VPS
routing configuration accordingly.
Conclusion
Now, you should be able to plug the server anywhere, and everything should magically work.
References
[1] https://mullvad.net/en/help/pfsense-with-wireguard
[2] https://www.jeroenbaten.nl/the-complete-guide-to-setting-up-a-multi-peer-wireguard-vpn/