
Contents
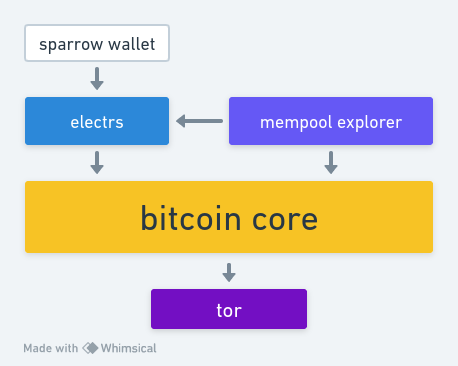
The Sovereign Stack
This guide will show you how to setup a bitcoin stack, so you can use bitcoin in a sovereign, private and secure manner.
The stack consists of five different software: Tor, Bitcoin Core, Electrs, Mempool and Sparrow Wallet.
To run this stack, provision a linux box. This guide assumes basic Unix knowledge,
and a debian-based distro (I'm running Ubuntu Server 22.04). If you're running
another distro branch, adjust accordingly. Ideally, you want at least 8GB of RAM
and 2TB of storage to run everything comfortably for a few years.
Let's dive in and setup each one:
Tor
Tor is an network multi-layer encryption protocol, used in the Tor Network. It routs a packet across multiple nodes on the network, adding another layer of encryption on each one. That way, only the first node knows the source of the packet, and only the last node knows the destiantion of the packet. Middle nodes are completely blind to both source and destination. They merely receive an encrypted blob, add another encryption layer to it, and pass it on to the next hop.
Although Tor is a very good system, it is not perfect, since government actors are know to run exit nodes, which provide information they can use to perform correlation attacks. Also, the network is vulnerable to DDoS attacks, having been rendered pratically unusable in 2022 due to this.
More info can be found at torproject.org.
Install tor:
$ sudo apt install tor
Add this to /etc/tor/torrc:
ControlPort 9051
CookieAuthentication 1
CookieAuthFileGroupReadable 1
Add $USER to the debian-tor group:
$ sudo usermod -a -G debian-tor $USER
Restart tor:
$ sudo systemctl restart tor
That's it, tor is now running.
Bitcoin Core

Bitcoin Core is the reference implementation of the bitcoin consensus
protocol, written in C++. It is responsible for building your own copy of the blockchain,
connecting to other nodes, broadcasting transactions and deciding, based on
it's own rules, if a received transaction block is valid or not. Your
API to the network, in short.
It is actively developed by hundreds of people around the world,
and follows a strict proposal-implementation-review process before any
changes are merged to the master branch. Because of this, mistakes
that pose a threat to the network are extremely rare.
More info can be found on github and
bitcoincore.org.
Create a folder:
$ mkdir bitcoin && cd bitcoin
Import the maintainers PGP keys, so we can assure the integrity of the binary:
$ git clone https://github.com/bitcoin-core/guix.sigs
$ gpg --import guix.sigs/builder-keys/*
Download Bitcoin Core. At time of writing (827000), we are on release v26.0:
$ wget https://bitcoincore.org/bin/bitcoin-core-26.0/bitcoin-26.0-x86_64-linux-gnu.tar.gz
Download the list of SHA256 checksums and signatures of these checksums:
$ wget https://bitcoincore.org/bin/bitcoin-core-26.0/SHA256SUMS
$ wget https://bitcoincore.org/bin/bitcoin-core-26.0/SHA256SUMS.asc
Verify the checksum of the release file:
$ sha256sum --ignore-missing --check SHA256SUMS
Verify that the SHA256SUMS file was signed by the PGP keys imported earlier:
$ gpg --verify SHA256SUMS.asc
Extract the binary and install it:
$ tar xzf bitcoin-26.0-x86_64-linux-gnu.tar.gz
$ sudo install -m 0755 -o root -g root -t /usr/local/bin bitcoin-26.0/bin/*
Bitcoin Core is installed. Now start the daemon:
$ bitcoind
Let's configure it. Stop the process and navigate to ~/.bitcoin. Create
a file named bitcoin.conf, and add the following to it (adjust it to your own environment):
# accept RPCs
server=1

# auth params for external calls
rpcuser=foo
rpcpassword=bar

# listen for RPCs on all interfaces
rpcbind=0.0.0.0

# allow RPCs from these addresses
rpcallowip=192.168.1.0/24

# index transactions
txindex=1

# only peer over Tor:
#proxy=127.0.0.1:9050
#listen=1
#bind=127.0.0.1
Let's create a systemd service for bitcoind, so it starts on boot and restarts on failure
automatically. Go to /etc/systemd/system/ and create a file named bitcoind.service:
[Unit]
Description=Bitcoin Core Daemon
After=network-online.target

[Service]
User=<user>
Type=simple
Restart=on-failure
ExecStart=/usr/local/bin/bitcoind

[Install]
WantedBy=multi-user.target
Then, activate and start it:
$ sudo systemctl enable bitcoind.service
$ sudo systemctl start bitcoind.service
Now, let it sync. This may take a while, from hours to days,
depending on your CPU.
Once it is synched to 100%, move to the next step.
Electrs

Electrs is a Rust implementation of the Electrum Server. It indexes all adresses and transactions on the blockchain, whereas Bitcoin Core only indexes those that concern the user's wallet. This allows quick queries for any address.
Wallets may come with a predefined, public (read: someone else's computer) electrum server. This implicates that this someone else has knowledge of all your transactions, balances and used addresses, along with your IP address. Not very private. If you run your own, that won't happen.
More info can be found on github.
Electrs will be built from source. Let's install the required dependencies:
$ sudo apt update
$ sudo apt install clang cmake build-essential
$ curl --proto '=https' --tlsv1.2 -sSf https://sh.rustup.rs | sh
$ source ~/.bashrc
$ cargo install cfg_me
Electrs can be both statically or dynamically linked. We'll link
it statically.
Download the electrs repo:
$ cd ~/
$ git clone https://github.com/romanz/electrs
$ cd electrs
Now build it (takes a while):
$ cargo build --locked --release
Let's create a systemd service for electrs. Go to /etc/systemd/system/
and create a file named electrs.service:
[Unit]
Description=Electrum Rust Server
After=bitcoind.service

[Service]
WorkingDirectory=/home/<user>/electrs
ExecStart=/home/<user>/electrs/target/release/electrs --log-filters INFO --db-dir ./db --electrum-rpc-addr="0.0.0.0:50001"
User=<user>
Group=<user>
Type=simple
KillMode=process
TimeoutSec=60
Restart=always
RestartSec=60

[Install]
WantedBy=multi-user.target
Add this line to ~/electrs/electrs.toml:
auth="foo:bar"
Then, activate and start it:
$ sudo systemctl enable electrs.service
$ sudo systemctl start electrs.service
Sync took about 5 hours on my box.
That's it. Onto the next.
Mempool
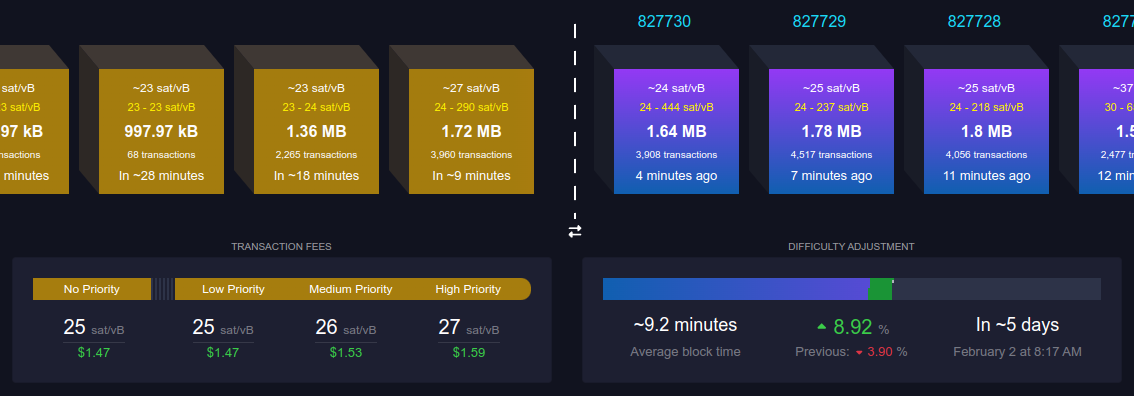
Mempool is a block and mempool explorer and visualizer. With it, you can
query addresses, transactions (confirmed and unconfirmed) with a nice interface.
The instance run by the developers can be found at mempool.space.
If you use a public explorer (mempool.space, blockstream.info, blockchain.com, ...), they can collect an address/transaction and IP pair. This enables some off-chain survaillance. By running your own instance, you are querying your own server.
It connects to both Bitcoin Core and Electrum on the backend.
More info can be found on github.
Download the mempool repo and checkout the latest release:
$ git clone https://github.com/mempool/mempool
$ cd mempool
$ latestrelease=$(curl -s https://api.github.com/repos/mempool/mempool/releases/latest|grep tag_name|head -1|cut -d '"' -f4)
$ git checkout $latestrelease
Now, let's setup MariaDB:
$ sudo apt install mariadb-server mariadb-client
Create a DB and grant privileges:
$ sudo mariadb

MariaDB [(none)]> drop database mempool;
Query OK, 0 rows affected (0.00 sec)

MariaDB [(none)]> create database mempool;
Query OK, 1 row affected (0.00 sec)

MariaDB [(none)]> grant all privileges on mempool.* to 'mempool'@'%' identified by 'mempool';
Query OK, 0 rows affected (0.00 sec)
Install dependencies:
# install nvm
$ curl -o- https://raw.githubusercontent.com/nvm-sh/nvm/v0.39.1/install.sh | bash
$ source ~/.bashrc

# install node.js v16.10
$ nvm install 16.10
$ nvm use 16.10

# install npm v7
$ npm install -g npm@7
Let's build the backend:
cd backend
npm install --no-install-links
npm run build
Now configure it:
$ cp mempool-config.sample.json mempool-config.json
On "CORE_RPC", change USERNAME and PASSWORD to
match those on bitcoin.conf.
On "ELECTRUM", change "PORT" from 50002 to 50001.
I ran into a problem where mempool attempts to connect
to a DB socket that does not exist (note that this will vary
depending on your OS). On mempool-config.json, on
"DATABASE", change "SOCKET" from:
/var/run/mysql/mysql.sock
to:
/run/mysqld/mysqld.sock
Let's make a systemd service for the mempool backend. Create
a file named /etc/systemd/system/mempool-backend.service:
[Unit]
Description=Mempool Backend
After=electrs.service

[Service]
WorkingDirectory=/home/<user>/mempool/backend
ExecStart=/home/<user>/.nvm/versions/node/v16.10.0/bin/npm run start
Environment=PATH=/home/<user>/.nvm/versions/node/v16.10.0/bin/:/usr/local/bin:/usr/bin:/bin
User=<user>
Group=<user>
Type=simple
KillMode=control-group
TimeoutSec=60
Restart=always
RestartSec=60

[Install]
WantedBy=multi-user.target
Then enable it and start it:
$ sudo systemctl enable mempool-backend.service
$ sudo systemctl start mempool-backend.service
The mempool backend sync can take a while. You can move on to the frontend while you wait.
Now, let's build and run the frontend:
$ cd ~/mempool/frontend
$ npm install
$ npm run build
$ npm run serve
As is, you can only access it via localhost, since you probably should
have a reverse proxy in front of it. But if you're just using it on your
local network, that's hardly necessary. To access it on your LAN,
modify the serve script in package.json to this:
"serve": "npm run generate-config && npm run ng -- serve --host 0.0.0.0 --disable-host-check",
What this does is bind the process mempool is running to all interfaces,
not just localhost.
Now let's make a systemd service for the frontend. Create
a file named /etc/systemd/system/mempool-frontend.service:
[Unit]
Description=Mempool Frontend
After=mempool-backend.service

[Service]
WorkingDirectory=/home/<user>/mempool/frontend
ExecStart=/home/<user>/.nvm/versions/node/v16.10.0/bin/npm run serve
Environment=PATH=/home/<user>/.nvm/versions/node/v16.10.0/bin/:/usr/local/bin:/usr/bin:/bin
User=<user>
Group=<user>
Type=simple
KillMode=control-group
TimeoutSec=60
Restart=always
RestartSec=60

[Install]
WantedBy=multi-user.target
Then enable it:
$ sudo systemctl enable mempool-frontend.service
Now, open the mempool frontent at <server_ip>:4200.
Once the backend is done synching, you'll have a private
block/address/transaction explorer running on your own infra.
You can use my instance at mempool.luisschwab.net.
Sparrow Wallet
 Sparrow Wallet is a FOSS bitcoin-only wallet that enables easy UTXO management,
supports offline signing (PSBT), native Tor support, PayNym support,
and has a very nice UI.
Sparrow Wallet is a FOSS bitcoin-only wallet that enables easy UTXO management,
supports offline signing (PSBT), native Tor support, PayNym support,
and has a very nice UI.
This is where you make transactions, generate new addresses and the works.
It can connect to either Bitcoin Core or an Electrum Server.
More info can be found on sparrowwallet.com.
You'll install Sparrow on your personal machine. There is a
TUI-based implementation (Sparrow Server), but it doesn't offer
nearly as much functionality as the GUI version.
Begin by importing the developer's PGP key:
$ curl https://keybase.io/craigraw/pgp_keys.asc | gpg --import
Download the binary, the manifest and the manifest signature:
$ wget https://github.com/sparrowwallet/sparrow/releases/download/1.8.2/sparrow_1.8.2-1_amd64.deb
$ wget https://github.com/sparrowwallet/sparrow/releases/download/1.8.2/sparrow-1.8.2-manifest.txt
$ wget https://github.com/sparrowwallet/sparrow/releases/download/1.8.2/sparrow-1.8.2-manifest.txt.asc
Verify the release:
$ gpg --verify sparrow-1.8.2-manifest.txt.asc
You should see something like this:
gpg: assuming signed data in 'sparrow-1.8.2-manifest.txt'
gpg: Signature made Thu Jan 18 12:35:34 2024 SAST
gpg:                using RSA key D4D0D3202FC06849A257B38DE94618334C674B40
gpg: Good signature from "Craig Raw <[email protected]>" [unknown]
Check that the SHA256 hash of the binary matches the manifest:
$ sha256sum --check sparrow-1.8.2-manifest.txt --ignore-missing

sparrow_1.8.2-1_amd64.deb: OK
Install it:
$ sudo dpkg -i sparrow_1.8.2-1_amd64.deb
Once installed, open the wallet and press CTRL+P, and go to the server
menu. Then, choose Private Electrum, and put your servers IP address
and the port electrs is running at (50001). If you click Test Connection,
you should see something like this:
Connected to electrs/0.10.2 on protocol version 1.4
Batched RPC enabled.
Server Banner: Welcome to electrs 0.10.2 (Electrum Rust Server)!
That's it. You're now running the sovereign stack.